
An electrical relay controls a high current circuit, such as a large LED light bar, from a low current circuit. Relay switches are crucial if you intend to wire up a light bar with an extremely high amp draw. You may not need a relay switch if you are using a light pod that does not require a lot of power, but you will need one if you use a large LED light bar. A relay isn’t necessary for off-road lights. How to wire off-road lights without relay?
Off-road light can be connected without a relay if you do not need to worry about power, and it will work fine for you. An LED’s maximum output can be achieved by converting the battery voltage down and back up again. LEDs should never be run at high current because it causes heat and melt wires.
Wire them carefully because if the wires leading out of them are damaged or shorted, they won’t work properly and may cause future problems.
Nevertheless, sometimes a relay is avoided in favour of alternative methods like switches or circuits. An effective method for wiring LED lights without relays is to develop the right ideas.
Off-Road LED Lighting Without Relay- Steps to Follow:
Wiring LED lights without a relay can be accomplished in the following steps. Be sure to follow the instructions.
Step 1- LEDs: Choosing the Right One:
LEDs or Light Emitting Diodes can be chosen according to their colour temperature and operating life. It is best to choose LEDs with a higher colour temperature than those with a lower colour temperature since they tend to be more efficient.
It would be appropriate to use a colour temperature between 2700K to 3000K. Besides their working life, they can also be selected according to their life expectancy, ranging from 20,000 to 50,000 hours.
Step 2- Choosing Power Supply:
A power supply must be selected after the LED is chosen for wiring. It should be such that it has the appropriate wattage and voltage to power the LED.
Choose LEDs having the same voltage and amperage to sufficient the current. The procedure would not be too complicated, and it would also be very easy to perform.
Step 3- Repairing the Circuit:
Choosing a power supply that is more powerful than the total supply voltage should be the top priority when wiring LEDs. Parallel wiring should be used in this situation. In the case of fewer LEDs, series wiring could also be used.
Step 4- Identifying The Resistor:
The formula that you should follow to determine the value of the resistor that you need for your circuit is;
Voltage drop (source voltage - LED voltage) / LED current amps = ohm
A power source of 10 volts and 4.1 volts (0.1 amps) results in a resistor value of 590 ohms when used with a LED rated at 4.1 volts and 10 milliamps (0.01 amps).
You can approximate the score by purchasing a resistor with a value close to this. Before choosing a resistor, you must calculate the voltage and amperage correctly.
LEDs can explode if their current value is too high. Hence, safety is paramount. After that, the LED anode is soldered to the resistor.
Step 5- Power Supply Wiring:
Make sure the switch is turned off to avoid any mishaps. Use copper wire to connect the other side of the resistor to one switch terminal. To complete this step, the copper wire must be soldered to the switch and the resistor.
Connect the other terminal of the switch to the positive side of the power supply with a piece of wire. Put a “+” on the red terminal of this power supply.
Connect the third wire between the LED cathode and power supply. Solder the wire to the LED and the power supply at this point. It is imperative to place the anode and cathode to ensure bright lighting properly.
Ensure the LED is lit when the switch is turned to the ‘on’ position. Check the brightness of the light-emitting component as well.
Best LED Bulbs for Off-Road Use Only
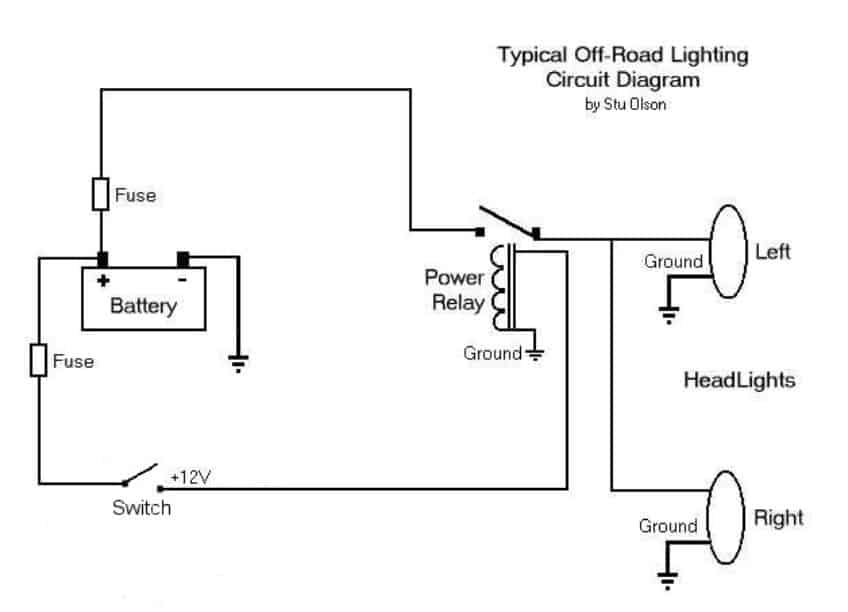
Circuit Diagram of Typical Off-Road Lights:

Understanding Off-Road Lights Without Relays Before Installation:
- Use heat-resistant materials if you are not using a relay.
- A minimum of 14 ga wire should be used; 12 ga or 10 ga can provide an extra safety margin and allow for higher Walt lights in the future.
- You should use a switch that can withstand the heat produced by the off-road lighting system. Make sure that the switch matches the vehicle.
- Connect only the lights to the connection without a relay. You can end up burning the fuses repeatedly if you use other things like phone chargers etc.
- Halogen, HID, and LED are three types of off-road lights. Depending on the voltage and watts, you can wire them without relays only if they are compatible. HID and halogen lamps become much hotter than LED lamps. Therefore, LEDs are easier to install without a relay because of the larger gap between Watt and Relay.
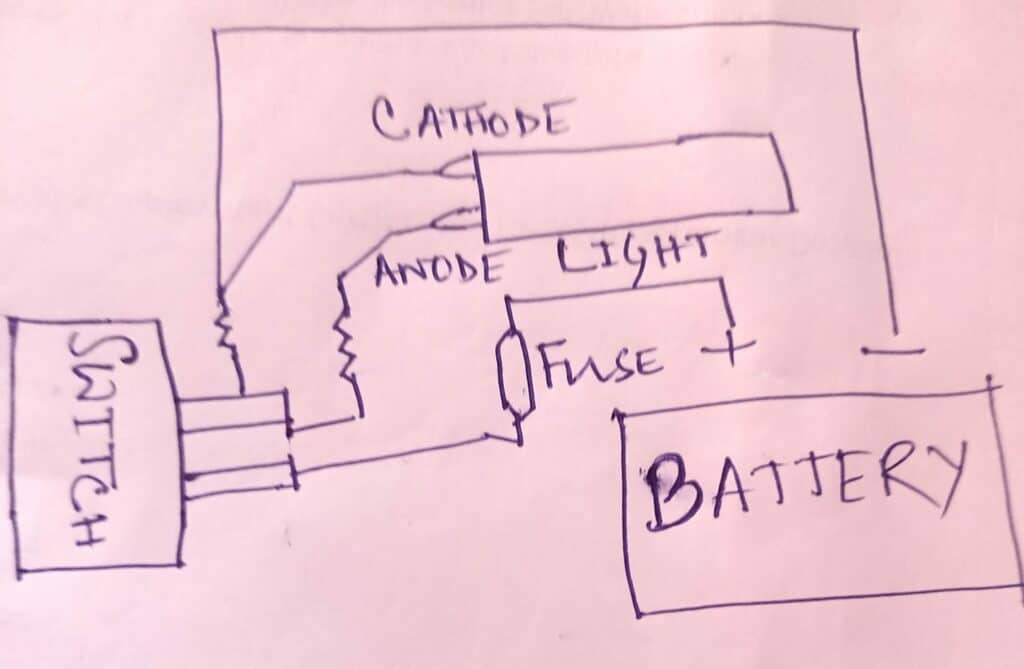
Wiring a Switch Directly:
By directly wiring off-road lights, you can install them without using a relay. Lights, power supplies, and resistors that can power the lighting system should be selected.
Step-by-step instructions are provided for offroad wiring lights without a relay. To mount and wire the vehicles’ lights, you have to go through some steps.
To connect the rocker switch, the first terminal should be connected to the cathode of the light and negative terminal of the battery, the middle terminal should be connected to the anode of the light, and the last terminal should be connected to the positive terminal of the battery or power supply. At the two first terminals are the resistors.
Points to Remember While Wiring Off-Road Lights Without Relay:
1. Choosing Your Lights:
Start by selecting the lights. Besides Halogen and HID, LEDs offer higher illumination and a longer lifespan than other technologies.
2. The Power Supply Should be Correct:
The Power Supply is the other main component. In terms of voltage, Watts, and amperage, the Power Supply must be compatible with the lights. Each light must have the same voltage, watt, and amperage.
3. Right Resistor:
TheThe resistor must be chosen correctly. When selecting the correct resistor, you must calculate the amperage drawn from the voltage and amperage of the lighting system because high currents can result in the lights blowing up. Watts = Amps x Volts is the formula for calculating the amp draw.


Connect the Switch to The Lights:
Step 1:
Ensure the rocker switch is in the “off” position for safety reasons; the rocker switch has three terminals. Use copper wire to connect one side of the resistor to the first switch terminal.
Step 2:
Both ends of these connections must be soldered to the switch and resistor. It is recommended that the wires be selected in the manner described above. The cathode of the light will be connected to this wire, along with the negative side of the battery.
Step 3:
Attach the anode of the light to the second middle terminal of the switch. A resistor can also be placed between this connection and the anode.
Step 4:
The last switch terminal should be connected to the positive side of the power source; this could be the battery or a wire from the battery. If necessary, solder the connections. In this case, a fuse must be installed inline.
Step 5:
Ensure that the light works by turning on and off the switch after all the connections are made. You can now move on to the next step after disconnecting the battery’s negative terminal.
Step 6:
Attach the off-road light to the vehicle
You need to mount the lights based on which off-road light you want to install on your vehicle. If you want to install off-road lights without a relay, all these lights are mounted differently, but their wiring will be the same.
- It is possible to mount these lights on the vehicle in their assigned positions or mount them creatively.
- Once the lights are installed, secure them with the brackets provided.
Step 7:
Installation of the switch
Before you begin installing the switch, you must disconnect the negative terminal of your battery. You will not have any current until you connect the negative terminal again. This prevents any injuries or shocks from occurring.
- Put the switch in an easily accessible place in your vehicle, so you don’t have to look for it while driving. In the second step, you have already wired the switch; repeat this step if you have multiple lights and want separate switches for each of them.
Step 8:
After running the switch wires through the engine bay, the next step is to install the switch. Grommets can either be used with direct engine access or carefully poked into the firewall.
Step 9:
From the switch to the light, the wire will be directly connected. In this case, it would be a good idea to connect a backup cable and connect another wire to the ring terminal.
Off-Road Lights: Pros and Cons of Not Using a Relay
Pros:
- Relays are slow to respond; you can quickly turn lights on and off without them
- It may cause sparks to ignite if it is vulnerable to normal wear and tear as a relay is an additional part of the electrical system.
- Microelectronic circuits can be used.
Cons:
- In some cases, if you do not use a relay, switches may overheat
- Lights with high current cannot be controlled with switches alone. That could be dangerous
- There are times when the lights will be weak without a relay; at that time, you will need to install a relay to ensure full brightness.
Final Thoughts:
The type of LED, power supply, and resistor can be determined and wired to a switch in this case. Using this method, one can easily wire an LED and avoid using a relay in the process.
By following the simple steps of direct wiring, you can install off-road lights without using a relay. You have to choose the lights, a power supply that works with the lights, and a resistor that can handle the current drawn by the lighting system.
Rocker switch terminals are connected to the cathode of light and the battery’s negative terminal. The middle terminal is connected to the anode of light, and the last terminal is connected to the positive terminal of the battery or power supply.
The resistors are connected to the first two terminals. Once the wiring has been completed, the lights and switches can be mounted in the vehicle.
Frequently Asked Questions (FAQs):
Relay switches: what are they, and why do I need them?
Relays are electronic switches that allow a low current circuit to control a high current circuit, such as a large LED light bar. A relay switch is necessary if your light draws a large amount of electricity. An ordinary switch may overheat, burn up the wires, and reduce the amount of electricity that gets to your light.
Without a relay, can a led light bar be wired?
LED light bars can be wired without relays. However, this is not advisable. If you are unsure about this, the switch, fuses, and wiring should be of the right size for the amperage. If you are unsure, you should use a relay to prevent something from going wrong.
If you know everything will go well and there is no risk of anything going wrong, you can wire an LED light bar without a relay.
Is a relay required for off-road lights?
Off-road lights should only be used when LEDs with a high current draw require higher voltage levels than a car’s battery can supply. Because of how much power they are running through the circuit, this way, they won’t overheat as quickly.
You can wire the light bar without a relay if you don’t need to concern yourself with power, which should suffice for your needs. You need to be careful when wiring them since if one of the wires leads out of it, it will not be working correctly and may cause problems in the future.
For off-road lights, what kind of wire do you use?
You’ll need 14 to 10 gauge wire, depending on how much power your lights will draw.
Without a relay, can fog lights be wired?
It can be wired without the relay, but you need to be extra careful and check all connections more frequently. The wires will not function correctly if there is no power flowing through them, which may cause you problems with your lights in the future.
Do wiring fog lights require a relay?
The wiring of fog lights or driving lights with 30-60A draws relays. Relays prevent switches from getting too hot and creating unwanted resistance. As a result of the low current through the switch, the relay is triggered to connect to the heavy load of fog lights at a higher current.
What if you don't have a relay to power spotlights?
If your spotlight does not come with one, a relay will need to be installed. There is no need to wire a stoplight directly to a power source without first running it through a relay. Purchase an SPST (Single Pole Single Throw) Relay from your local auto parts store if your kit does not include one.
What is the purpose of a relay for spotlights?
In addition to switching low-current triggers to high-current ones, relays can also turn circuits on and off and reverse polarity. LED lights, such as off-road light bars, working lights, or auxiliary lights, require a circuit to be powered adequately.


This is Surya. I am an experienced off-roader. I have been off-roading for many years across several terrains. I am passionate about 4×4 driving and want to share my knowledge and experience with others.
My goal is to provide you with the most comprehensive and unbiased information about off-roading.
I curated this article through my personal experience and expertise, and I hope it helps you with what you are looking for.
 (+91)9123743026
 24/1 Nibedita Sarani. M.B. Road, Kolkata- 700051, India