Using a Hi-Lift Jack Safely, From Base Plate to Lowering
This post contains Amazon affiliate links. As an Amazon Associate I earn from qualifying purchases, at no extra cost to you.
To use a Hi-Lift jack safely, chock the opposite wheel, set the base on firm ground under a flat steel jack point, clip the handle upright before you flip the reversing latch, and pump with both hands. Lift one wheel only, never more than 2 inches off the ground, and set the vehicle on blocks before anyone works near it.
Those limits come straight from Hi-Lift's own instruction manual. The other common surprise is height: a lifted 4x4 can run a 42-inch jack out of travel before the tire even leaves the dirt. The checker further down shows whether yours is tall enough.
Is a Hi-Lift the right jack for this job?
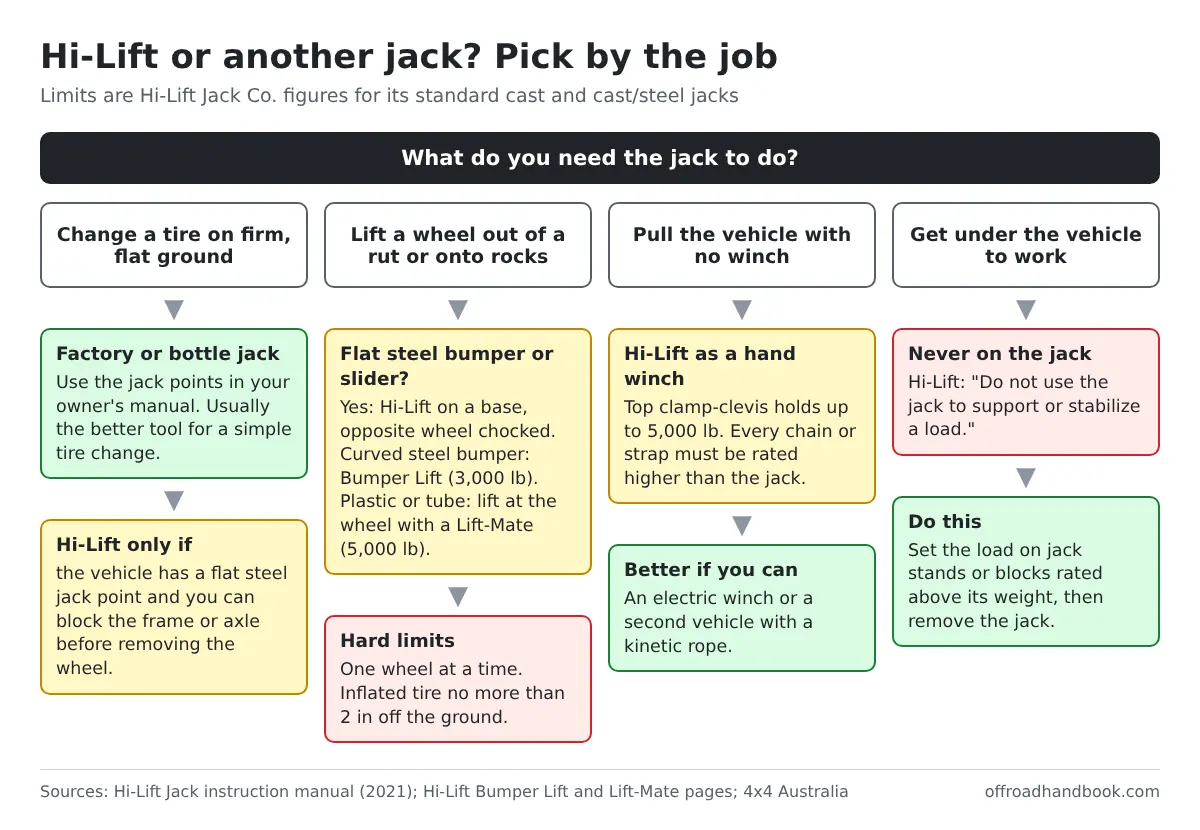
A Hi-Lift is a long mechanical lever on a perforated steel bar. It shines when you need a lot of travel: lifting a wheel out of a rut so you can stack rocks under it, or raising the body of a lifted rig that a bottle jack can't reach.
For a plain tire change on firm ground, the jack that came with your vehicle (or a bottle jack) is usually the better tool. 4x4 Australia's high-lift guide makes the same call. If you're fixing a puncture rather than swapping the wheel, our guide to plugging a flat on the trail may save you the lift entirely.
And a Hi-Lift is never a stand. The manual's first danger warning is "Do not use the jack to support or stabilize a load." Lift, block, lower onto the blocks, then remove the jack.
Hi-Lift jack specs by size: lift height and load limits
Every standard Hi-Lift carries the same 4,660 lb rated load and 7,000 lb tested load. What changes with bar length is how high the nose can climb. That's the number that decides whether a jack works on your rig.
| Hi-Lift model | Weight | Overall height | Max lift height at nose | Rated load | Tested load |
|---|---|---|---|---|---|
| 36 in cast/steel | 25.02 lb | 41 in | 27 in | 4,660 lb | 7,000 lb |
| 42 in cast/steel | 26.35 lb | 43.5 in | 32 in | 4,660 lb | 7,000 lb |
| 42 in all-cast | 27.78 lb | 46 in | 34 in | 4,660 lb | 7,000 lb |
| 48 in cast/steel | 27.66 lb | 48.75 in | 37.24 in | 4,660 lb | 7,000 lb |
| 48 in all-cast | 28.16 lb | 50.75 in | 38.63 in | 4,660 lb | 7,000 lb |
| 60 in cast/steel | 30.12 lb | 59.25 in | 48.25 in | 4,660 lb (upper 12 in: 2,660 lb) | 7,000 lb (upper 12 in: 4,000 lb) |
| 60 in all-cast | 31.31 lb | 61.75 in | 49.75 in | 4,660 lb (upper 12 in: 2,660 lb) | 7,000 lb (upper 12 in: 4,000 lb) |
Every figure in this table comes from the spec pages of Hi-Lift's 2021 manual. On two of those pages the value columns sit one row lower than their labels, so I matched each number to its row by checking that the inch and centimeter pairs agree (34 in = 86.36 cm, for example).
Two things in that table get missed. The 60-inch jacks lose almost half their rating near the top of the bar. And "tested load" isn't a working limit: plan around 4,660 lb, not 7,000.
Hi-Lift says its current jacks are tested and certified to the applicable requirements of ASME B30.1-2015, the US standard for jacks (see the X-treme jack page). If you buy a similar jack from another brand, go by its own label and manual rather than assuming Hi-Lift's numbers apply.
Where to put a Hi-Lift jack on your 4x4
The jack's nose needs a flat, solid steel surface. Aftermarket steel bumpers and rock sliders often have dedicated Hi-Lift points; if yours do, use them.
Hi-Lift is blunt about the rest: using the jack on curved or tubular bumpers "will result in the vehicle slipping off the jack and falling." Plastic bumper covers and most stock bumpers are out too. You have two factory-approved workarounds:
- Curved steel bumpers: the Hi-Lift Bumper Lift, rated 3,000 lb, for raising one wheel up to 2 inches.
- Plastic bumpers or tall lifts: the Lift-Mate, rated 5,000 lb, which hooks the wheel itself so you lift the tire directly.
If you need either one, the Hi-Lift Lift-Mate is on Amazon; check the current price there. Lifting at the wheel also takes suspension droop out of the equation, which matters a lot on lifted rigs (more on that below).
Ground matters as much as the jack point. The manual calls for a firm, level, dry surface with the bar pointing straight up. In sand or mud, a wide base keeps the foot from sinking or kicking out; the Hi-Lift Off-Road Base is a wide plastic base Hi-Lift makes to stop the jack sinking on soft ground.
How to raise a vehicle with a Hi-Lift jack, step by step
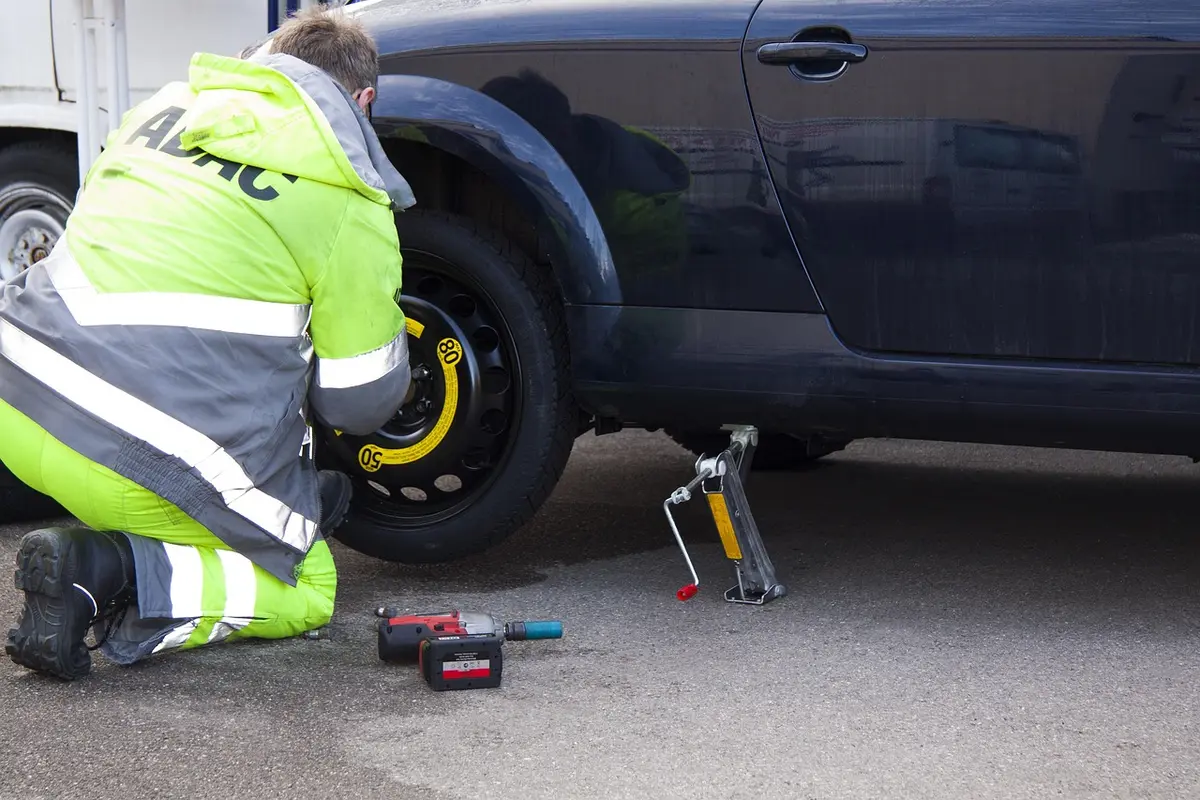
This sequence follows Hi-Lift's "Raising a Stationary Load" procedure. Inspect the jack first: climbing pins not worn, bar straight, holes clear, mechanism lubricated.
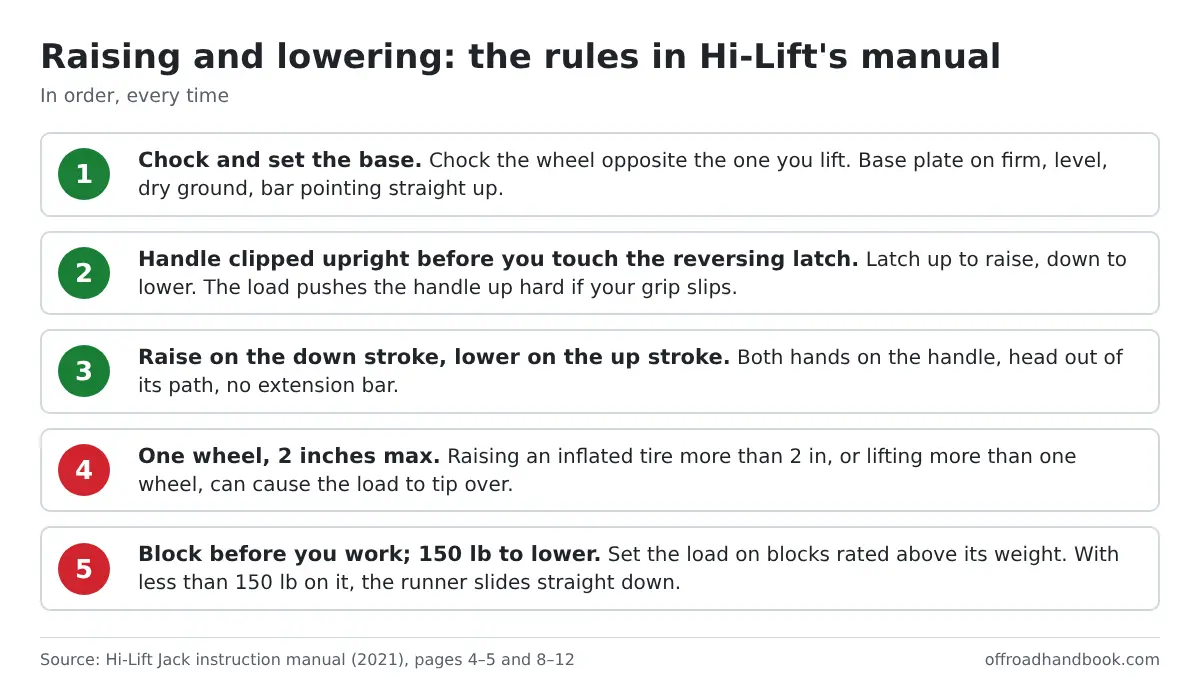
- Chock the vehicle. Set the parking brake and chock a wheel at the opposite end from the one you're lifting, as Hi-Lift's manual shows.
- Set the base. Firm, level, dry ground, or a base plate. Bar vertical.
- Latch up. Lift the reversing latch until it locks in the up position.
- Position the runner. Pull the handle off the bar (releasing the clip spring) and slide the lifting mechanism up until the large runner sits fully and squarely under the jack point.
- Pump with both hands. The load rises on each down stroke. Don't add a cheater bar. Stop if the vehicle or jack starts to move, and don't continue until it's safe.
- Stop at 2 inches. An inflated tire should come no more than 2 inches off the ground, and only one wheel at a time.
- Clip the handle upright against the bar.
- Block the load with stands or cribbing rated above the weight, then lower onto them and remove the jack.
Keep your head out of the handle's arc the whole time. During lifting and lowering, the vehicle's weight pushes up on the handle; if your hands slip, or the handle is level when you move the latch, it can whip up fast.
Hi-Lift height checker: is your jack tall enough?
Here's the part most guides skip. When you lift at the bumper or slider, the body rises first while the suspension extends, and the tire stays planted until the axle hangs at full droop. Only then does the wheel come up.
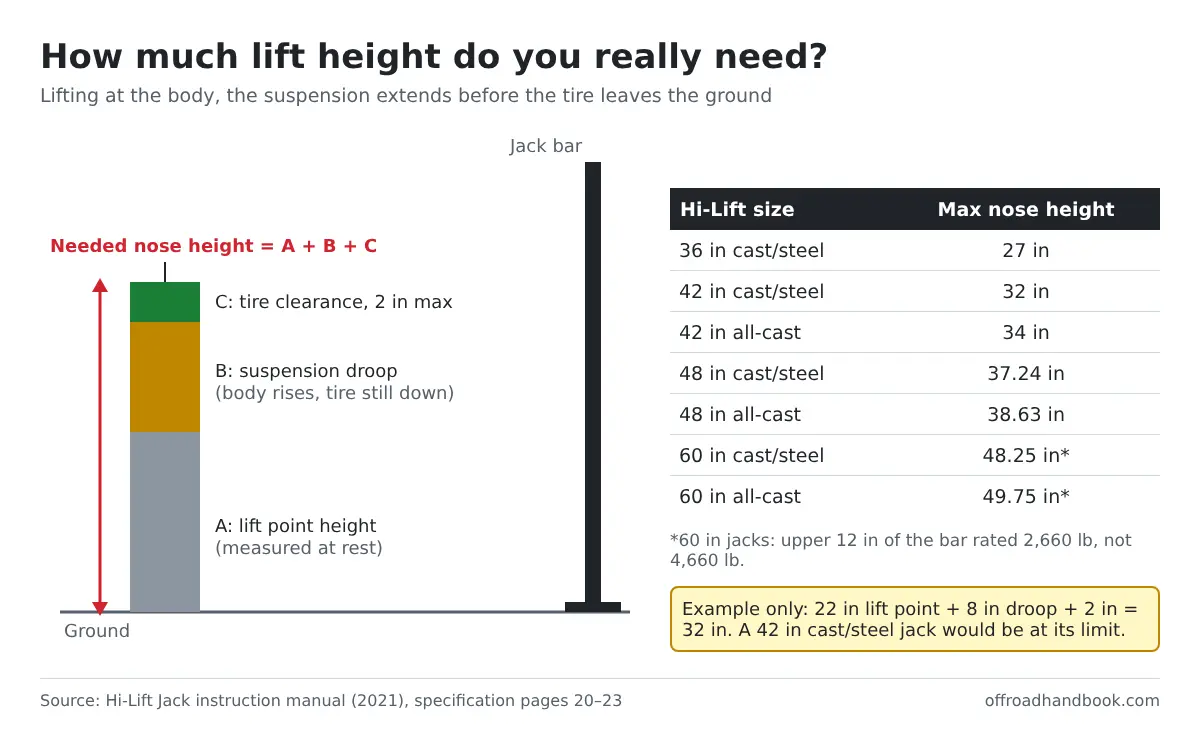
So the nose has to reach the lift point's resting height, plus the droop, plus up to 2 inches. Measure both numbers at home on flat ground. For droop, raise the same corner with a floor jack at the same point and note how far the point rises before the tire just leaves the floor.
The checker adds your three numbers and compares the total with the maximum nose heights in Hi-Lift's spec table. It assumes the base sits on firm ground; a base plate or a sinking foot changes the result by its own thickness.
The 2,660 lb note is an estimate of where the 60-inch bar's reduced-rating zone starts, so treat any result near that line as the lower rating.
If the numbers don't work, you have two fixes besides a longer jack. Lifting at the wheel with a Lift-Mate removes droop from the equation. Or, as 4x4 Australia suggests, run a ratchet strap between the axle and the chassis to limit droop before lifting at the body.
Shopping for a jack after running the numbers? The Hi-Lift 48-inch jack comes in both cast/steel and all-cast versions; check the current price on Amazon and match the version to the nose height you need.
How to lower a Hi-Lift jack without the handle kicking
Hi-Lift's warnings center on the moment you move the reversing latch, when the load's push goes straight into the handle. The manual's lowering sequence:
- Raise the load slightly off the blocks with the jack, then remove the blocks.
- Clip the handle upright against the bar before touching the latch.
- Move the reversing latch to the down position.
- Grip the handle firmly with both hands and pump. The load drops one notch on each up stroke.
One rule surprises people: the jack needs at least 150 lb on it to lower step by step. With less, the mechanism slides straight down the bar to the base. Clear bystanders before you start.
If the jack binds under load, don't force it. The manual says to use another jack with equal or greater capacity to lower the load safely, then clean, lubricate and test the bound jack without a load.
Using a Hi-Lift as a winch or clamp
With the bar laid between an anchor and the stuck vehicle, a Hi-Lift becomes a hand winch. The top clamp-clevis is rated to 5,000 lb when winching, and every chain, strap and shackle in the line needs a working load higher than the jack's. If a link breaks, the load can shift or the strap can snap back.
Keep the top clamp-clevis in line with the bar, use a tree strap on any tree anchor, and expect to re-rig after every bar length of pull. Hi-Lift's Off-Road Kit instructions also say to chock the vehicle while it's under load and keep everyone at a safe distance, because it will move as you winch.
It's slow, hard work and best kept as a backup. For a heavy rig in deep mud, our winch size calculator shows the line pull a real winch would need, and our guide to using a snatch block explains how to double it.
Clamping uses the same jack with the top clamp-clevis turned 90 degrees to the bar. The standard clevis tops out at 750 lb of clamping force; past that it can bend or break.
Hi-Lift maintenance: lube, cleaning and storage
Hi-Lift names rusty climbing pins, dirt and a worn bar as the causes of binding. It also says the jack isn't self-lubricating and lists exactly what to use and where:
- Use: light penetrating oil, or a silicone or Teflon spray.
- Never use: motor oil or grease.
- Where: the front and back edges of the steel bar, climbing pins, springs, pitman pin and pitman bolt.
- Cleaning: air, water pressure or a stiff brush, then a non-flammable solvent or degreaser. Never work on the jack while it's under load.
- Storage: handle clipped upright, reversing latch up, in a dry place, preferably indoors. If it has to live outside, Hi-Lift suggests a protective cover.
Repair only with genuine Hi-Lift parts; the manual warns that other parts make the jack unsafe and void the warranty. A trail kit of cribbing, gloves and a strap pairs well with the rest of your recovery straps and ropes.
Hi-Lift jack FAQ
How much weight can a Hi-Lift jack lift?
Standard Hi-Lift jacks are rated for 4,660 lb and tested to 7,000 lb. On 60-inch models, the upper 12 inches of the bar are rated for 2,660 lb (tested to 4,000 lb).
Can you change a tire with a Hi-Lift jack?
Yes, if the vehicle has a flat steel jack point. But the jack can't be the support: set the frame or axle on stands or blocks before you pull the wheel. On firm ground, the factory jack is usually simpler.
What size Hi-Lift jack do I need?
Add your lift point's resting height, your suspension droop and up to 2 inches of tire clearance. Pick a jack whose maximum nose height beats that total; the checker above does the math for every size.
Why did my Hi-Lift drop straight down when I lowered it?
It needs at least 150 lb on the nose to lower one notch at a time. With less weight on it, the lifting mechanism slides down the bar to the base.
Can I use a Hi-Lift on a stock Jeep bumper?
Only if it's a flat steel surface the nose can seat on. Hi-Lift warns against curved, tubular and plastic bumpers. Use the Bumper Lift for curved steel bumpers or the Lift-Mate to lift at the wheel.

I'm Suryashankar Dasgupta, the founder of Off-Road Handbook. I've been off-roading for years in the USA, including California and Texas, and have ridden mountain and desert terrain abroad. I've also driven a Jeep Compass for more than seven years, so I know the day-to-day side of Jeep ownership first-hand, from the Uconnect screen to the warning lights. Every guide here is researched from manufacturer owner's manuals, NHTSA recall and service-bulletin records and other trusted sources, checked against them before it is published, and corrected when we find a mistake. You can read how we work in our editorial policy: https://offroadhandbook.com/editorial-policy/
Like our off-road guides? Add Off-Road Handbook as a Google Preferred Source so our latest Jeep, ATV, UTV, trail, recovery, and off-road troubleshooting articles can appear more often in your Google Search experience.
Add us as a Preferred Source