Flat on the Trail? How to Plug It Right (and When You Can't)
Last updated on October 29th, 2026 at 07:06 pm
You can plug a trail puncture and keep driving if the hole is no bigger than about ¼ inch (6 mm), sits in the tread face and not the shoulder or sidewall, and the tire hasn't been driven flat. Treat the plug as a ride-out-of-here repair, not a permanent one: the tire industry's repair standard calls for the tire to come off the wheel for an inside inspection and a plug-and-patch combination. This guide covers how to judge a hole in 30 seconds, how to plug it properly, and what to do afterward.
Step one: decide whether the tire is pluggable at all
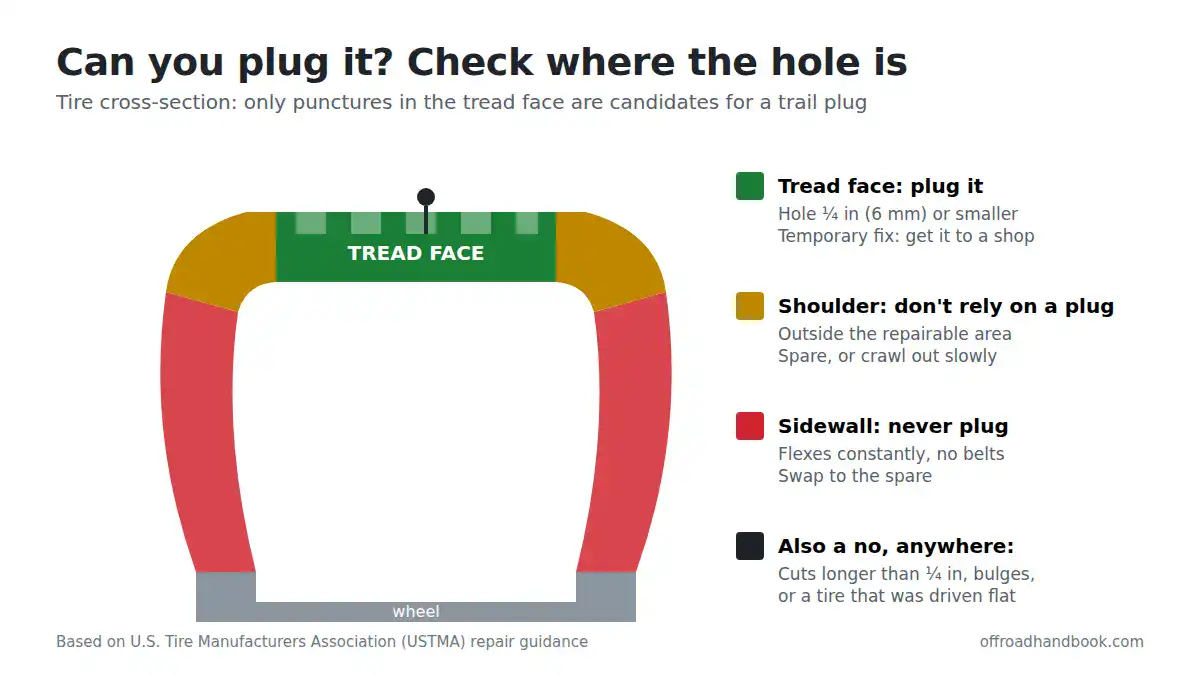
Most failed trail repairs come from plugging something that shouldn't have been plugged. Check these before you open the kit:
| What you see | Plug it? | Why |
|---|---|---|
| Nail, screw or thorn hole in the middle of the tread, ¼ inch or smaller | Yes, as a temporary repair | Falls inside the puncture limit used by tire manufacturers and repair associations |
| Hole near the shoulder (where tread curves into the sidewall) | Emergency only, drive slowly and replace the tire | Repair standards exclude injuries that reach the shoulder or belt edge |
| Sidewall puncture, cut or bulge | No (spare, or a last-resort field fix to get out) | Sidewalls flex constantly and have no belts; shops will not repair them |
| Slice or gash longer than the width of a pencil | No | Over the ¼ inch limit, and a plug can't close a cut |
| Rock bruise with a bubble | No | Internal cords are already broken. Swap to the spare |
| Tire was driven flat for any distance | Only to limp out | Sidewall damage inside the tire is invisible from outside |
| Plug already in that spot | No | Repair units can't overlap |
The numbers come from the repair rules published by the Rubber Manufacturers Association and Tire Industry Association, summarized by Tire Review: punctures of no more than ¼ inch, no repairs that extend into the shoulder or belt edge, and no overlapping repairs. The U.S. Tire Manufacturers Association likewise limits repairs to the tread area only.
The part most guides skip: was it driven flat?
A small hole that leaks slowly is a different problem than a tire you rolled on at 0 psi for a quarter mile of rocks. Once the sidewall folds under the vehicle's weight, the inner liner and cords can be damaged where you can't see them. If you noticed the flat late, plug it to get out, then plan to replace the tire instead of assuming the plug fixed it. If the tire still looks fine and holds pressure, still keep your speed down on the way out.
What to carry
- A plug kit with a T-handle reamer and insertion needle, rubber cement, and a fresh stock of plugs
- Flush-cut pliers or a razor blade for trimming
- A real air compressor. The tiny 12V inflators that came with a kit struggle to refill a 33-inch tire from near-zero (compare compressor fill times by tire size)
- A tire pressure gauge and a valve core tool
- Soapy water in a small spray bottle to confirm there are no leaks
- Jack, lug wrench and a solid base for the jack, since you may need to rotate the puncture to the bottom or swap to the spare anyway
- Gloves and pliers to pull the object out
How to plug a tire on the trail
- Make the spot safe. Get on level, firm ground, set the parking brake, chock a wheel on the opposite side, and lift the wheel if the jack is stable. If you're on a ledge or sidehill, move first.
- Find the leak. Spray soapy water and watch for bubbles. If an object is stuck in the tread, leave it in until you're ready, because it plugs the hole while you set up.
- Judge it with the table above. Wrong size or location? Go to the spare.
- Pull the object with pliers, noting its angle and size.
- Ream the hole. Push the reamer in firmly and work it up and down while twisting until the hole is uniform and the walls feel rough. This is what lets the cement and plug bond. Don't skip it just because the nail hole "looks clean."
- Load the plug. Thread a plug through the eye of the insertion needle so it's centered, and coat it generously with rubber cement.
- Insert. Push the needle straight in with steady pressure until only about an inch of plug is outside the tire, then pull the tool straight out in one motion. The plug should stay behind.
- Trim. Wait a few minutes for the cement, then cut the plug about ⅛ inch above the tread.
- Re-inflate and re-check. Bring the tire up to your road pressure (door-jamb placard, or the pressure you were running for the trail if you still have rough ground ahead). Spray the repair and the bead for bubbles.
This sequence matches the standard plug kit procedure described by RealTruck, which also notes plugs are semi-permanent and professional patching is preferred when you can get it.
If you were airing down when it happened
Low pressure is the normal situation when a trail flat happens, since you're probably running 12-18 psi on rocks or sand (see our off-road tire pressure guide). The problem isn't the plug, it's the bead. If the tire has partially unseated from the rim, you'll need to reseat it before it'll hold air, and that takes a strong compressor and sometimes a ratchet strap around the tread. Easier to avoid: if you've lost most of the pressure, don't drive on it to a better spot unless you have to.
After the trail: finish the job properly
A plug alone is not considered an acceptable permanent repair by the industry. The RMA and TIA state that you should never use only a plug or only a patch, and that a repair requires removing the tire from the rim for an inside inspection. A plug-and-patch combination applied from the inside is the proper fix, per Tire Review's summary of those rules.
- Within a few days, take the vehicle to a shop and tell them the tire was plugged and, if it happened, driven low or flat.
- Ask them to dismount it, inspect the inside, and decide whether it can take a patch-plug or needs replacement.
- Expect them to refuse if it's near the shoulder, over ¼ inch, or damaged inside. A refusal is the right call, not an upsell.
Until you get it done, watch the pressure with a gauge before every drive and keep highway speeds modest. TireAgent notes a plug can hold air for weeks or months, but shouldn't be counted on for the life of the tire.
Special cases
- Beadlock wheels: You need the correct wrench and the know-how to loosen and re-torque the ring. Don't try this for the first time on the trail.
- Run-flat tires: Manufacturers differ, and some prohibit repairing them. Check your tire maker's guidance before relying on a plug.
- Sidewall damage as a last resort: If you're far from help and have no spare, some experienced off-roaders stuff multiple plugs into a sidewall hole or use an external patch kit to limp out. That's an emergency gamble, not a repair. Drive very slowly, expect to replace the tire, and don't carry on with the trip.
Plug or spare: how to decide fast
If the hole is small, central in the tread and the tire hasn't rolled flat, a plug usually takes well under an hour and leaves you with a spare still intact. If there's any sidewall, shoulder or bubble involvement, don't spend time plugging: put the spare on. Your spare is also your only backup if the plug fails, so wherever possible, spend the plug on a tire you can afford to lose and keep the spare for the second flat. See our trail prep checklist for what else belongs in the truck, the ATV and UTV troubleshooting guide if you ride side-by-sides, and trail etiquette for moving off the track while you work.
FAQ
Is a tire plug safe to drive on?
For getting home or out of the backcountry, yes, when the hole is within the limits above and the tire holds pressure. As a permanent repair, the industry standard says no: have it patched from the inside or replaced.
How big a hole can you plug?
Up to ¼ inch (6 mm) in diameter in the tread area, according to the RMA/TIA repair guidelines.
Can I plug a sidewall?
Shops won't, and the standards don't allow it. In a true emergency a plug may get you out, but replace the tire afterward.
How long does a trail plug last?
It varies. Reputable sources describe weeks to months of reliable sealing at best, and none support counting on it for the life of the tire. Don't push that.
Do I need to air the tire back up before driving out?
Yes, once you've leak-checked the repair. Driving a plugged tire low on pressure on pavement heats the sidewalls and defeats the point of the repair.
Related guides

I'm Suryashankar Dasgupta, the founder of Off-Road Handbook. I've been off-roading for years in the USA, including California and Texas, and have ridden mountain and desert terrain abroad. I've also driven a Jeep Compass for more than seven years, so I know the day-to-day side of Jeep ownership first-hand, from the Uconnect screen to the warning lights. Every guide here is researched from manufacturer owner's manuals, NHTSA recall and service-bulletin records and other trusted sources, checked against them before it is published, and corrected when we find a mistake. You can read how we work in our editorial policy: https://offroadhandbook.com/editorial-policy/
Like our off-road guides? Add Off-Road Handbook as a Google Preferred Source so our latest Jeep, ATV, UTV, trail, recovery, and off-road troubleshooting articles can appear more often in your Google Search experience.
Add us as a Preferred Source