How to Reseat a Tire Bead on the Trail: Safe Methods and Limits
Last updated on October 13th, 2026 at 10:40 am
To reseat a tire bead on the trail, clean and lubricate the bead, get the tire centered on the wheel, wrap a ratchet strap around the tread to push the beads outward, and inflate with a compressor or a bead-seating tank while staying out of the tire’s trajectory. Do not use starting fluid, lighter fluid or any fire. Never go above 40 psi to seat a bead unless the tire maker specifies a different limit.
A bead that pops off the rim is common after airing down, but most of the time it is fixable with gear that fits in a tub. The risk is in the shortcuts. This guide covers why beads unseat, what to carry, and a safe order of attempts. It also explains why the flammable-spray method is dangerous.
Safety first: pressure limits and why fire is off the table
The U.S. Tire Manufacturers Association (USTMA) says to follow the tire manufacturer’s maximum bead-seating pressure and otherwise not exceed 40 psi. Its bulletin for passenger and light truck tires states: “Never inflate beyond 40 psi pressure to seat beads” (USTMA TISB Vol. 46 No. 4). Seating pressure is not the same as the pressure printed on the sidewall, which is the maximum operating pressure for the tire. A load range E tire rated to 80 psi still should not be pushed past 40 psi to seat a bead.
If both beads are not seated at 40 psi, USTMA says to deflate completely, reposition the tire, relubricate and try again. The same bulletin says never to stand, lean or reach over the assembly during inflation, and to use a safety cage or other restraining device when the wheel is not locked on a mounting machine. Exceeding the limit “may break a tire bead (or even the rim) with explosive force, possibly resulting in serious injury or death.”
On flammables, USTMA’s bulletin on mounting aids is blunt: never, under any circumstance, introduce a flammable substance into a tire, because igniting it to seat the beads “is extremely unsafe” (USTMA TISB Vol. 41 No. 4). Its motorcycle bulletin also lists “a flammable or volatile substance, bead sealer, aerosol inflator” among things never to use to aid bead seating (USTMA TISB Vol. 5 No. 3). Ether, starting fluid, carb cleaner and lighter fluid all fall in that category.
A note on OSHA: 29 CFR 1910.177 requires employers to use a restraining device or barrier when inflating single-piece rim wheels. Its scope excludes automobiles and pickups running car or LT-designated tires, so it does not legally cover most trail rigs. It is still a useful benchmark for how seriously the industry treats a bead that lets go. It also says people should stay out of the trajectory and keep flat, solid surfaces more than a foot from the sidewall during inflation.
Why beads break loose on the trail
- Low pressure plus side load. Running low pressure on rocks or ruts lets the sidewall fold and the bead slip off the rim edge. See our off-road tire pressure guide for starting points by terrain.
- Airing down too far for the tire. Soft sidewalls (lower load ranges) give up the bead sooner than stiff ones. Our load range comparison explains the difference.
- Dirt, mud or sand between bead and rim. Debris breaks the seal and lets air leak after reinflation.
- Wheel or bead damage. A bent flange or a nick in the bead area may never seal. Stop and plan for a spare or a shop visit.
What to carry for a safe bead reseat
- A 12-volt compressor with enough output to inflate a large tire. A bigger tire takes much longer on a small unit.
- Two ratchet straps and a pair of tire irons or a pry bar.
- Tire lubricant made for mounting. USTMA says never to use antifreeze, silicones or petroleum-based lubricants. Dish soap and water is a common field substitute.
- A valve core tool and spare cores. Removing the core speeds airflow into the tire.
- An optional bead-seating tank or “bead blaster.” Choose a unit with a gauge and a relief valve, and follow its instructions.
- Eye protection, gloves and a pressure gauge you trust.
Safe methods, step by step
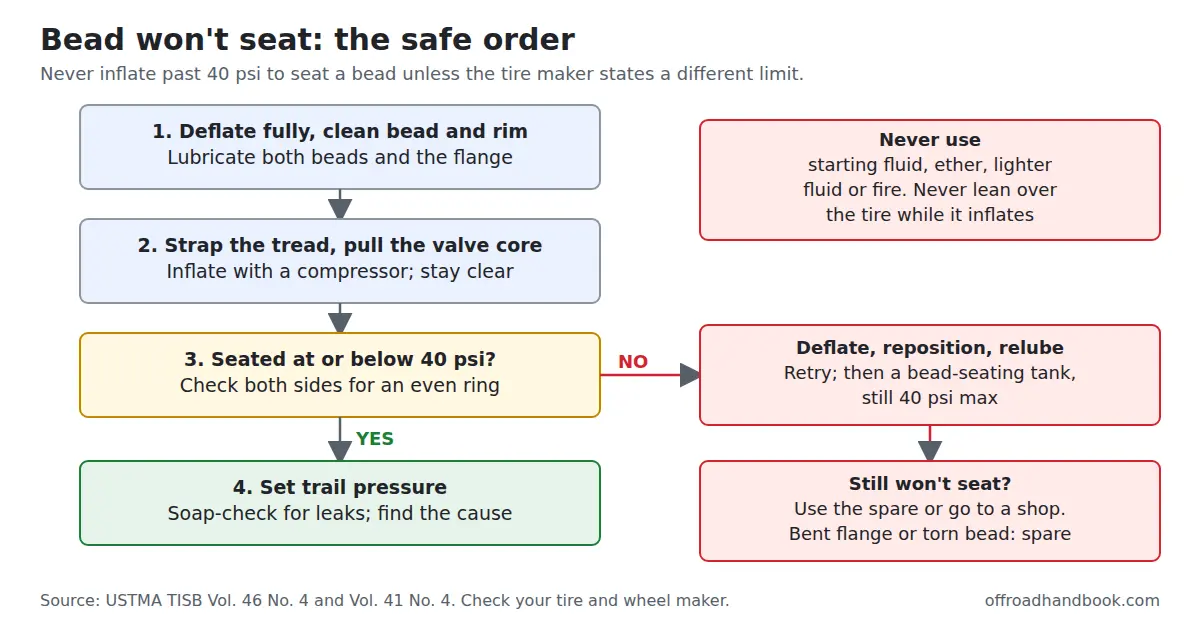
1. Reposition and lubricate
Deflate the tire fully. Clean dirt from the bead and rim. Brush lubricant on both beads and the rim flange. If one bead is still off the rim, get it over the flange with tire irons, and check that the tire sits evenly around the wheel before inflating.
2. Strap the tread
Lay the tire flat on firm ground with nothing resting on it. Wrap a ratchet strap around the center of the tread and tighten until the sidewalls bulge outward and the beads approach the rim. This is a widely used field method, described by off-road sources such as Expedition Portal. Remove the valve core, connect the compressor, and inflate. Often you will hear the bead pop onto the flange.
3. Use a bead-seating tool if the strap fails
A bead seater stores compressed air in a small tank and releases it in a burst through a large opening. Use only a tool sold for that purpose, point it at the tire as directed, and keep your body clear. Watch the gauge. If the tire has not seated by 40 psi, stop and go back to step 1.
4. Check and set operating pressure
Look at both sides of the tire. A pop is not proof of a good seat, and USTMA tells technicians to inspect both sides. Look for the molded ring near the bead sitting an even distance from the rim all the way around. Then adjust to your trail pressure. Check for leaks with soapy water before continuing. If you air down again, expect the bead to slip again unless you correct the cause. See our guide to plugging a flat on the trail if the leak is a puncture rather than a bead.
Situation, safe method, gear, and what not to do
| Situation | Safe method | Gear needed | What NOT to do |
|---|---|---|---|
| Bead slipped on one side, tire still mounted | Deflate fully, clean, lubricate, strap the tread, reinflate | Compressor, ratchet strap, lubricant, valve core tool | Do not inflate past 40 psi to chase a pop; do not lean over the tire |
| Strap method will not seat the bead | Reposition, relubricate, then use a bead-seating tank | Bead seater with gauge and relief valve, eye protection | Do not spray starting fluid, ether, carb cleaner or lighter fluid inside the tire |
| Both beads off after a hard hit | Re-mount with tire irons, lubricate, then strap and inflate | Two tire irons, lubricant, two straps, compressor | Do not stack gear or stand a spare against the wheel while it inflates |
| Compressor is too slow for a large tire | Remove the valve core for airflow, add a tank or a second compressor | Valve core tool, extra cores, tank | Do not use a flammable-gas or aerosol inflator to boost the seat |
| Bead will not hold at trail pressure | Seat at up to 40 psi, check for leaks, then reduce to your trail pressure | Gauge, soapy water | Do not keep airing down; the tire may be too soft for that pressure or the wheel may be damaged |
| Wheel flange is bent or bead is torn | Swap to the spare and get it inspected | Spare, jack, lug wrench | Do not heat, weld or hammer a rim to straighten it |
Sources for the table: USTMA TISB Vol. 46 No. 4; USTMA TISB Vol. 41 No. 4; USTMA TISB Vol. 5 No. 3; 29 CFR 1910.177; and the Expedition Portal strap method. Compiled by Off-Road Handbook; check your tire and wheel manufacturer for different limits.
Mistakes that cause bad seats
- Using too little lubricant, or skipping it.
- Skipping the valve core removal, which slows airflow and makes a small compressor look underpowered.
- Treating the sidewall maximum as the seating pressure.
- Standing over the tire, or leaving another wheel or a vehicle panel within a foot of the sidewall.
- Pumping flammable vapor in by accident. USTMA notes that alcohol or solvents stored near a compressor intake can be drawn into the tire.
When in doubt, drive slowly to a tire shop at the pressure the tire holds. Shops have restraint cages for a reason.
FAQ
What is the maximum PSI to seat a tire bead?
USTMA says to follow the tire manufacturer’s limit and otherwise not exceed 40 psi. If the beads have not seated by then, deflate and reposition rather than adding pressure.
Is the lighter or starting-fluid method ever safe?
No. USTMA states that igniting a flammable substance to seat the beads is extremely unsafe and may cause an explosion. The same warning covers ether and similar liquids placed in a tubeless tire.
Can I reseat a bead without an air compressor?
Not reliably. A hand pump may work on a small ATV tire, but a truck tire needs a compressor or an air tank. A spare tire is often the practical fix for a torn bead.
Do beadlock wheels change the process?
Beadlock wheels clamp the bead mechanically, so follow the wheel maker’s instructions for them. Use their instructions and torque specs instead of the steps here.
Sources
- USTMA TISB Vol. 46 No. 4: Proper tire mounting of low aspect ratio, high performance passenger and light truck tires (40 psi bead seating warning).
- USTMA TISB Vol. 41 No. 4: Tire bead lubricants, mounting aids and flammable substances.
- USTMA TISB Vol. 5 No. 3: Mounting procedures with safety cage and 40 psi language.
- 29 CFR 1910.177: Servicing multi-piece and single piece rim wheels (via Cornell LII).
- Expedition Portal: How to reseat a 4x4 bead
This guide is general information, not a substitute for your tire and wheel manufacturers’ instructions or a professional tire service.

I'm Suryashankar Dasgupta, the founder of Off-Road Handbook. I've been off-roading for years in the USA, including California and Texas, and have ridden mountain and desert terrain abroad. I've also driven a Jeep Compass for more than seven years, so I know the day-to-day side of Jeep ownership first-hand, from the Uconnect screen to the warning lights. Every guide here is researched from manufacturer owner's manuals, NHTSA recall and service-bulletin records and other trusted sources, checked against them before it is published, and corrected when we find a mistake. You can read how we work in our editorial policy: https://offroadhandbook.com/editorial-policy/
Like our off-road guides? Add Off-Road Handbook as a Google Preferred Source so our latest Jeep, ATV, UTV, trail, recovery, and off-road troubleshooting articles can appear more often in your Google Search experience.
Add us as a Preferred Source