Approach Angle Calculator: Will Your 4x4 Clear That Ledge?
Last updated on October 28th, 2026 at 06:27 pm
This post contains Amazon affiliate links. As an Amazon Associate I earn from qualifying purchases, at no extra cost to you.
Your approach angle is the steepest ramp your front end can climb before the lowest front point touches. Measure it with a line that touches the tire and that point, not with a line from the tire’s contact patch. Enter five or six tape-measure numbers in the calculator below and it gives you the approach, departure and breakover angles, plus what a taller tire or a lift would do to them.
The method matches how the federal government defines these angles in 49 CFR 523.2: lines tangent to the tire, not lines from the spot where the rubber meets the ground. That small difference moves the answer by roughly 3 to 8 degrees on typical numbers, which is the gap between clearing a ledge and crunching a bumper.
Approach, departure and breakover angle calculator
Approach, departure and breakover angle calculator
All measurements in inches, taken on level ground at your normal tire pressure. Results are estimates of the static geometry.
More free tools: see all our off-road calculators for tire size, regear, air-down pressure, winch size and more.
How it works: for each end of the vehicle, the calculator finds the line that is tangent to the tire (a circle with the radius you enter) and passes through your lowest point, then reports that line’s angle to the ground. Breakover adds the two tangent angles from the lowest belly point to the front and rear tires. It is the same geometry as the federal definitions in 49 CFR 523.2, applied to your own measurements. The what-if boxes assume taller tires raise the whole vehicle by half the added diameter, and that a suspension lift raises only the body-mounted points. They are estimates; real vehicles shift with load, tire squish and suspension travel.
How do you measure the three angles on your own 4x4?
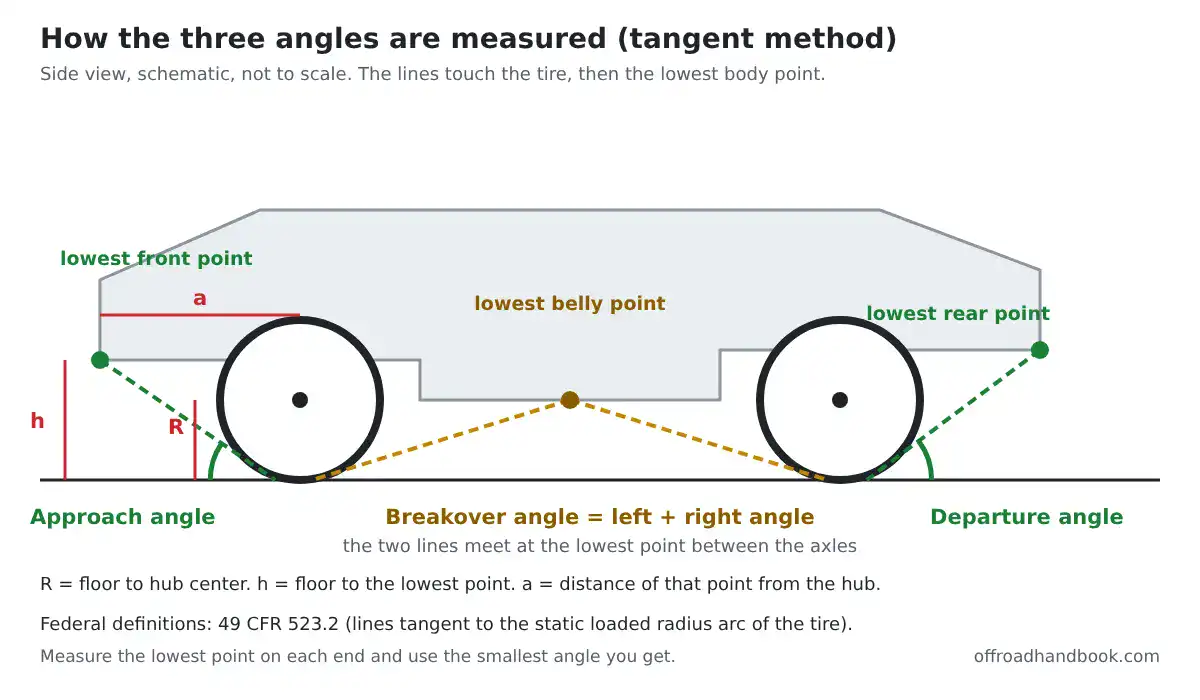
You need a flat floor or driveway, a tape measure, and a way to mark a point straight down from a body part. A plumb bob or a carpenter’s square works, and so does a small magnetic level held against the bumper. A digital angle finder is optional but handy for checking the result against a straight board laid against the tire. Park with the tires at your normal pressure and the vehicle loaded the way you wheel it.
- Hub height (R): measure from the floor to the center of the wheel hub. This is your loaded tire radius, and it is a little smaller than half the tire’s advertised diameter because the tire squishes under weight. See the mud tire size guide for how diameter is stated.
- Wheelbase: hub center to hub center, front to rear.
- Front point: find the lowest thing out front (bumper corner, winch, tow hook, license plate bracket, air dam). Measure its height off the floor (h) and, using the plumb line, how far ahead of the front hub it sits (a).
- Rear point: do the same at the back: hitch receiver, bumper corner, spare tire carrier, or exhaust tip. Height off the floor, and distance behind the rear hub.
- Belly point: find the lowest thing between the axles (skid plate, transfer case, crossmember, exhaust). Measure its height and how far it sits behind the front hub.
Check more than one candidate at each end. The definition in 49 CFR 523.2 uses the line that touches the underside of the vehicle, so the answer is the smallest angle you get from any point. A hitch can limit your departure angle even when the bumper looks fine. If you want a second set of eyes, a long straight board laid against the tire and the lowest point lets you cross-check the calculated angle when read with a digital angle finder.
Why does the tire-contact shortcut give the wrong approach angle?
Most quick guides tell you to take the height of the lowest point and divide by its distance from the tire’s contact patch, then hit the arctangent button. That treats the tire like a point on the ground. In reality the tire is a round obstacle in front of the axle, and the real ramp line has to graze it. Using the same measurements, the tangent method gives a different answer, and the gap grows as the point sits higher:
| Loaded tire radius | Lowest front point height | Distance ahead of hub | Shortcut (contact patch) | Tangent method |
|---|---|---|---|---|
| 15.5 in | 13 in | 30 in | 23.4° | 26.2° |
| 15.5 in | 17 in | 33 in | 27.3° | 30.6° |
| 14 in | 20 in | 40 in | 26.6° | 28.8° |
| 17.5 in | 22 in | 36 in | 31.4° | 36.0° |
| 15.5 in | 22 in | 28 in | 38.2° | 45.7° |
So the shortcut usually understates your approach angle, which errs on the safe side, but it also gives wrong answers when you plan a tire or lift change. The tangent version responds correctly to tire size.
What do bigger tires and a lift really do to your angles?
The table below runs one example truck through the same calculator. The starting geometry is a 15.5 in loaded radius, front point 17 in high and 33 in ahead of the hub, rear point 19 in high and 38 in behind the hub, and a belly point 10 in high at mid-wheelbase of a 118 in wheelbase. Taller tires raise everything, and also raise the tire’s tangent line. A lift raises the body points only. For a Wrangler's factory starting numbers, use Jeep's spec-sheet figures in our Wrangler ground clearance by trim guide.
| Change | Approach | Departure | Breakover |
|---|---|---|---|
| Starting point | 30.6° | 29.2° | 19.7° |
| Tires 2 in taller (no lift) | 32.6° | 30.9° | 21.7° |
| Tires 4 in taller (no lift) | 34.6° | 32.6° | 23.7° |
| 2 in suspension lift (same tires) | 33.9° | 32.0° | 23.6° |
| Tires 4 in taller + 2 in lift | 37.9° | 35.4° | 27.7° |
Two takeaways. In this example a 2 in lift gains about 3 degrees of approach and departure, roughly what 3 in of added tire diameter does, and about as much breakover as 4 in of tire diameter. But a lift only helps the lowest points that are mounted to the body. Differentials and axle-mounted parts stay put relative to the axle, so check ground clearance under the axles separately. Bigger tires also change wheel fitment, so see the wheel offset and backspacing guide for 35s before you buy.
How do you use the numbers on the trail?
An angle only helps if you compare it with the slope in front of you. A ramp or ledge steeper than your approach angle puts the bumper into it. Quick conversions: a slope’s percent grade is 100 times the tangent of its angle, so 20° is a 36% grade, 30° is 58%, 35° is 70%, and 45° is a 100% grade (one foot up for every foot forward).
| Angle | Percent grade | Federal off-highway benchmark |
|---|---|---|
| 15° | 27% | n/a |
| 20° | 36% | Departure angle minimum |
| 25° | 47% | n/a |
| 28° | 53% | Approach angle minimum |
| 30° | 58% | n/a |
| 35° | 70% | n/a |
| 40° | 84% | n/a |
| 45° | 100% | n/a |
Those federal numbers are classification thresholds measured at curb weight and recommended tire pressure (see 49 CFR 523.5), not a promise that a vehicle can handle any trail. Static angles also shrink in real use: a full load or trailer tongue weight compresses the rear springs, airing down lowers the tire’s loaded radius, and suspension compression under braking dips the nose. Re-measure at the ride height and tire pressure you will actually run (the off-road tire pressure guide covers that side) and keep a margin. The angles also say nothing about side slope; a ledge you can climb straight may roll you if you take it at a diagonal.
For choosing where to place the tires before you commit, see line choice for beginners, and for how the suspension helps once a wheel is up in the air, how articulation works. If your measurements say the bumper is the limit, a high-clearance bumper is one fix to look at, and beginner mod priorities helps you decide where to spend first.
Safety note
Do not test your angles by driving at a ledge to see what happens. Measure on level ground, use a spotter on obstacles that come close to your numbers, and walk the line first. Never put yourself under or beside a vehicle that is wedged on an obstacle.
Frequently asked questions
Is a higher approach angle always better?
For clearing obstacles, yes, but you pay for it somewhere else. Trimming a bumper or raising the front end can affect crash protection, recovery point placement and handling. Match the number to the terrain you drive instead of chasing the biggest figure.
Which point do I measure for approach angle?
The lowest point that touches the tangent line first, which is the one that gives you the smallest angle. Check the bumper corners, the license plate bracket, a winch or tow hook, and an air dam. Enter the worst one in the calculator.
Do the angles on a manufacturer spec sheet match what I will measure?
Not necessarily. The federal definition in 49 CFR 523.2 is measured at curb weight with tires at the manufacturer’s recommended pressure, and automakers state their own conditions for published numbers, often tied to one tire size and trim. Your own measurement with your tires, load and accessories is the one that counts.
Does airing down change my angles?
Yes, slightly. A softer tire has a smaller loaded radius and sits closer to the ground, so re-measure at the pressure you run on the trail.

I'm Suryashankar Dasgupta, the founder of Off-Road Handbook. I've been off-roading for years in the USA, including California and Texas, and have ridden mountain and desert terrain abroad. I've also driven a Jeep Compass for more than seven years, so I know the day-to-day side of Jeep ownership first-hand, from the Uconnect screen to the warning lights. Every guide here is researched from manufacturer owner's manuals, NHTSA recall and service-bulletin records and other trusted sources, checked against them before it is published, and corrected when we find a mistake. You can read how we work in our editorial policy: https://offroadhandbook.com/editorial-policy/
Like our off-road guides? Add Off-Road Handbook as a Google Preferred Source so our latest Jeep, ATV, UTV, trail, recovery, and off-road troubleshooting articles can appear more often in your Google Search experience.
Add us as a Preferred Source